

Christmas Sugar Cookies with Easy Icing. If I can make these things look pretty then anyone can. Really!

Do you like my Christmas tree? I’m quite proud of it. The first five were pretty dodgy, but I got the hang of it after that.
My problem was, I was trying to wing it. Just squirting on the icing and expecting it to look like I bought it from the bakery. Instead we had pools of green icing dripping off the sides of cookies – looking like Shrek just had a bogie explosion.
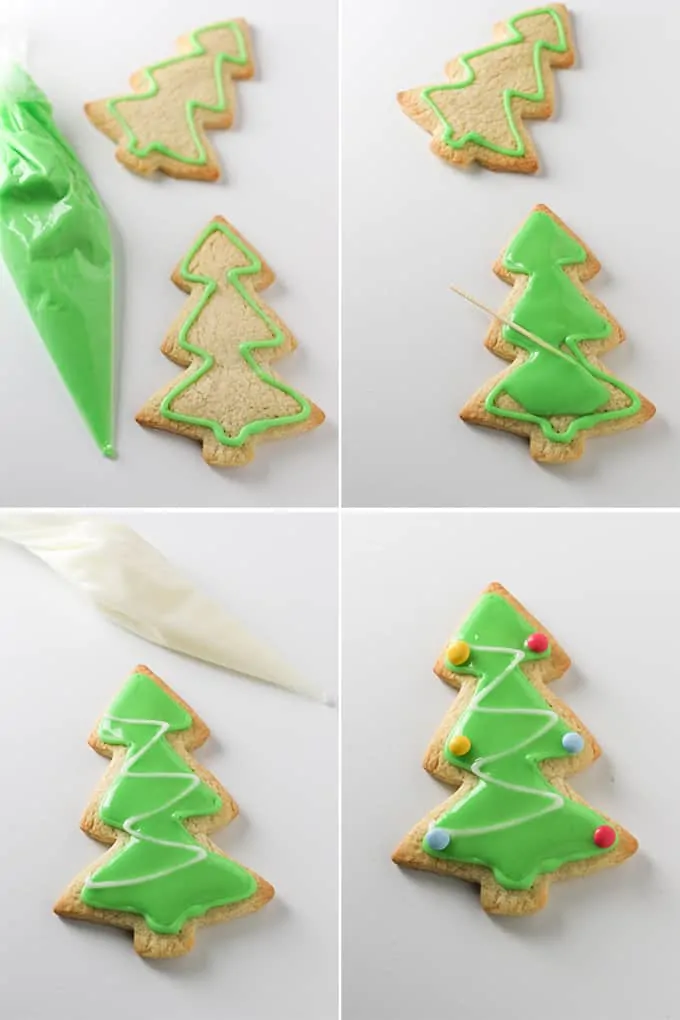
When I finally figured out that I needed a thicker icing to draw an outline, and then a thinner one to ‘colour in’ it all came together.
Almost too pretty to eat (but come on, it’s got Smarties on it, of course I’m going to eat it).
We really had some fun making these. I handed the icing bag over to one of my friends and asked her to have a go at a bit of decorating. And you know what? she did it perfectly first time.
Peh! I’m just not good at the artistic side of baking.
Give me a cupcake to frost and I can just about get away with it. Anything else involving any level of artistic skill and I have to pretend that one of my kids did it, just to hide the embarrassment 🙂
So honestly, if I can make these Sugar Cookies with Easy Icing look ok, then I’m sure yours will be fab.
In the meantime, my kids have finished school and started the countdown. Eight more sleeps to go!!!
More Cookies
After more biscuit and cookie inspiration? Try one of these:

Iced Sugar Cookies
Ingredients
Cookies:
- 90 g (1/4 cup + 2 tbsp) soft unsalted butter
- 100 g (1/2 cup) caster sugar
- 1 large egg
- ½ teaspoon vanilla extract
- ½ tsp almond extract
- 210 g (2 cups minus 2 tbsp) plain (all-purpose) flour plus more for rolling
- ½ teaspoon baking powder
Icing topping:
- 225 g (2 cups) confectioners’ sugar
- 4 tbsp milk
- food colouring paste
- mini smarties
- edible glitter
Instructions
- Beat the butter and sugar in a stand mixer for 3-4 minutes until fluffy. Add the egg, vanilla, and almond extract and beat for another minute to combine.90 g (1/4 cup + 2 tbsp) soft unsalted butter, 100 g (1/2 cup) caster sugar, 1 large egg, ½ teaspoon vanilla extract, ½ tsp almond extract
- Add half the flour and all of the baking powder and mix for 30 seconds until combined. Add in the rest of the flour and mix again until the dough just comes together.210 g (2 cups minus 2 tbsp) plain (all-purpose) flour, ½ teaspoon baking powder
- Place a large piece of baking parchment on the work surface and lightly flour it. Place the dough on top, sprinkle with a little more flour and roll out the dough to about 0.5cm thickness. Slide the baking parchment onto a baking sheet and cover in clingfilm, then place in the fridge for an hour (and up to 24 hours).
- Preheat oven to 175C/350F (fan). Line 2 baking sheets with baking parchment.
- Cut the dough into shapes using a cookie cutter. Re-roll any leftover dough and cut again. Continue to do this until all the dough is used (you should get at least 14 medium sized cookies).
- Place in the oven and cook for approx. 7-10 minutes until very lightly browned.
- Remove from the oven and allow to cool completely (they can cool on the tray or on a wire rack).
- Once the cookies are cool, make the icing. You’ll need a thick ‘border’ icing and a thinner ‘filler’ icing. Start by mixing the icing sugar and 2-3 tbsp of milk in a large bowl with a fork or whisk. You want a thick constancy – so that when you lift the whisk you get a trail of icing that takes 5 or 6 seconds to sink back in. This is your border icing.225 g (2 cups) confectioners’ sugar, 4 tbsp milk
- Now pour out half of the icing mixture into another bowl and add a tiny bit more milk (so that a trail sinks back in after 1-2 seconds). This is your filler icing.
- Add food colouring paste in your desired colour and spoon into disposable piping bags (I had 1 portion of white border icing, 1 portion of green border icing and 1 portion of green filler icing), Snip the very tips off the bags, then use the border icing to create patterns and borders. Use the filler icing to ‘colour in’ the cookies. The border icing should stop the icing running off the cookies. Use the filler icing quite sparingly and use a cocktail stick to gently push the filler icing up to the borders. If you want to draw a pattern on top of a layer of icing, then allow the bottom layer of icing to dry before piping any more on top.food colouring paste
- The Christmas tree cookies were made by using the green border icing to create the edges, then green filler icing to colour in the tree. I left this layer to dry, then used white border icing to create lines that look like tinsel. I then glued smarties to the branches using a little more border icing.mini smarties
- The star cookie pattern was created using white border icing. Sprinkle on a little edible glitter before the icing sets.edible glitter
Notes
Nutrition
Nutrition information is automatically calculated, so should only be used as an approximation.
More Christmas Baking Ideas
Some of the links in this post may be affiliate links – which means if you buy the product I get a small commission (at no extra cost to you). If you do buy, then thank you! That’s what helps us to keep Kitchen Sanctuary running. The nutritional information provided is approximate and can vary depending on several factors. For more information please see our Terms & Conditions.


These cookies are absolutely incredible and I didn’t have any almond extract do i replaced it with cinnamon. I will 100% make these all the time now and Im so glad ive found this recipe.
Although this is a Christmas themed post, I use this cookie recipe all year round can be cut into any shape – will be pumpkins and ghosts soon.
These are so cute!!! You’re braver than me, I’m still too scared to decorate cut out cookies! I just know it will be such a mess, but these are honestly beautiful!
Mine really were a mess a first 🙂 Got there after a few attempts though. I’ve seen your gorgeous cupcakes and cookies, I bet you’d do an amazing job!!